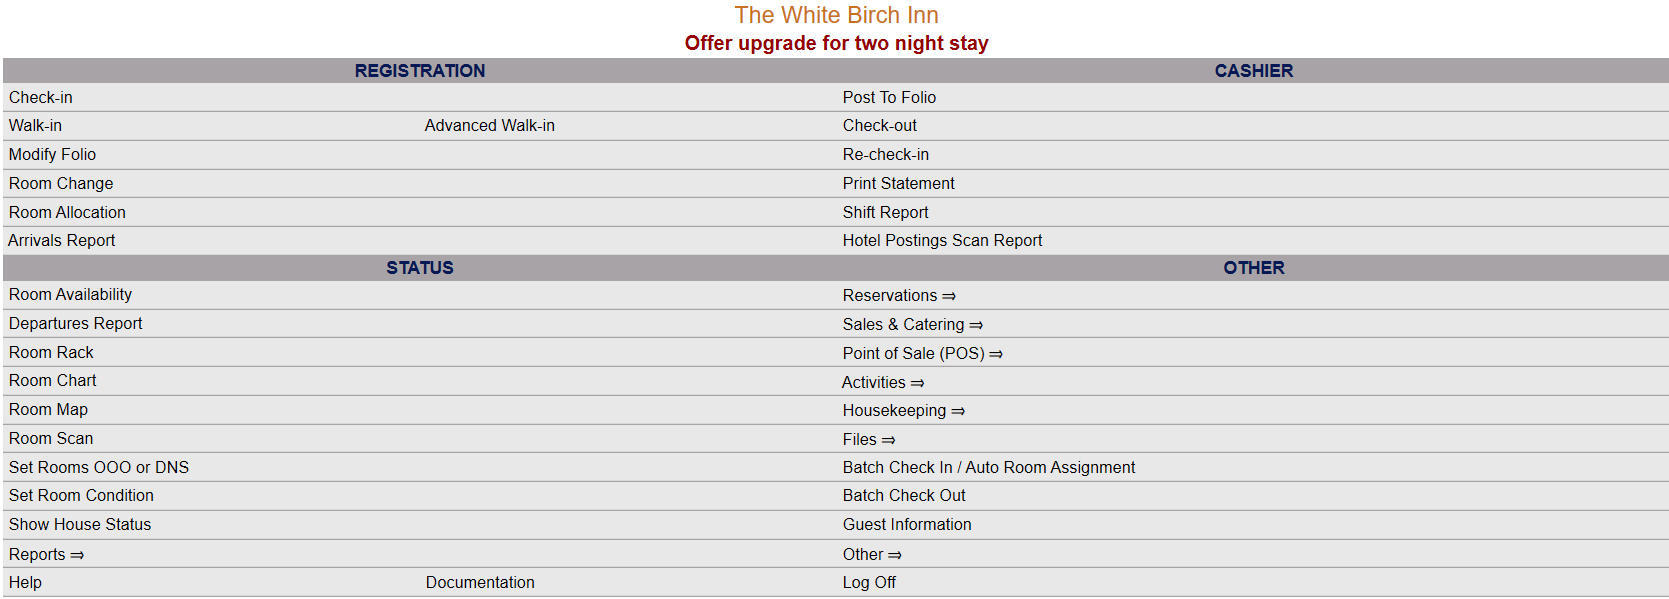
Click the icon on the left for the Full Menu.
 OR
OR 
This will display the Full menu in a tabular form, with four sections, Registration, Status, Cashier and Other.
 OR
OR 
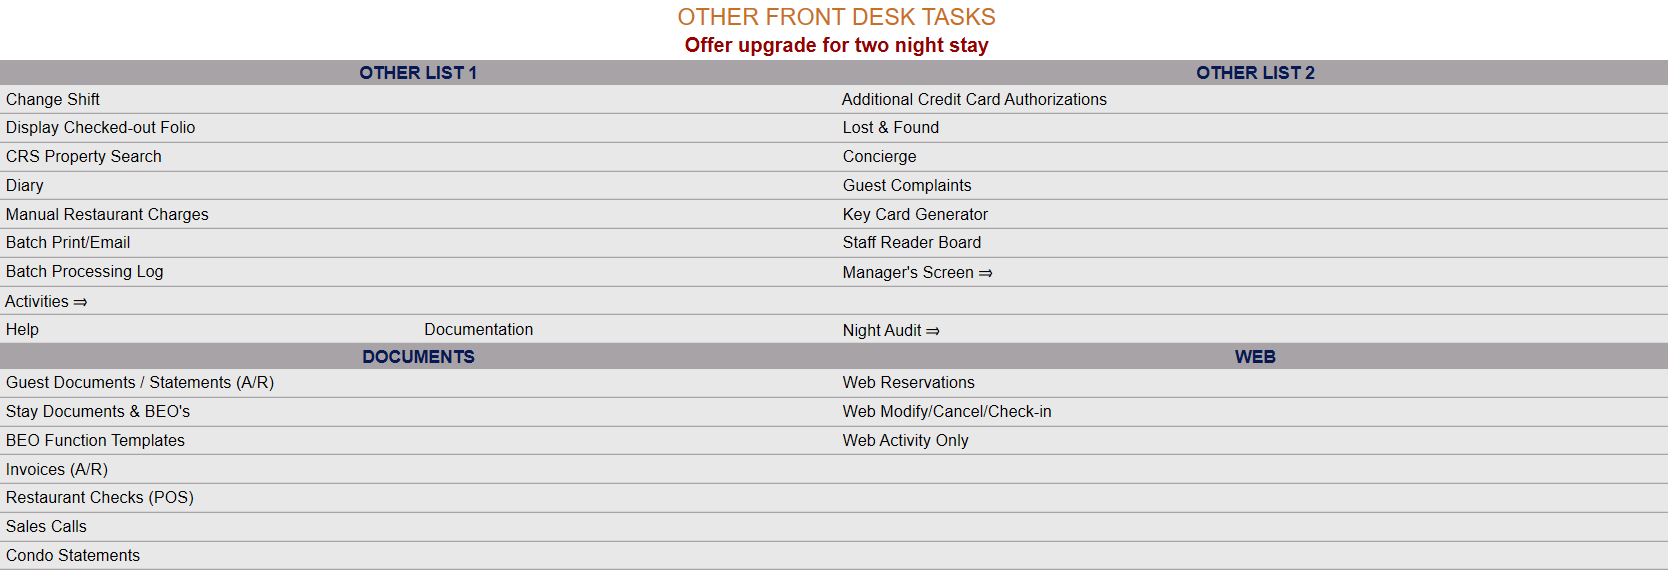
Select Other => from the Other section. This will display the Other Front Desk Tasks Menu, which has four sections, Other List 1, Other List 2, Documents and Web.
 OR
OR 
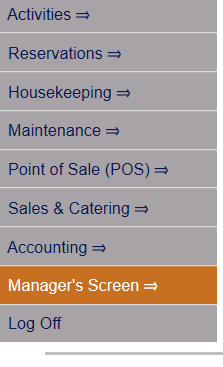
Select Managers Screen => from the Other List 2 section. This will display the Managers Commands screen. The Managers Commands screen has two sections, Managers Configuration and Managers Configuration.
 OR
OR 
OR: Select Manager's Screen => from the Quick Menu on the left side of the screen, to be taken directly to the Managers Commands menu.
 OR
OR 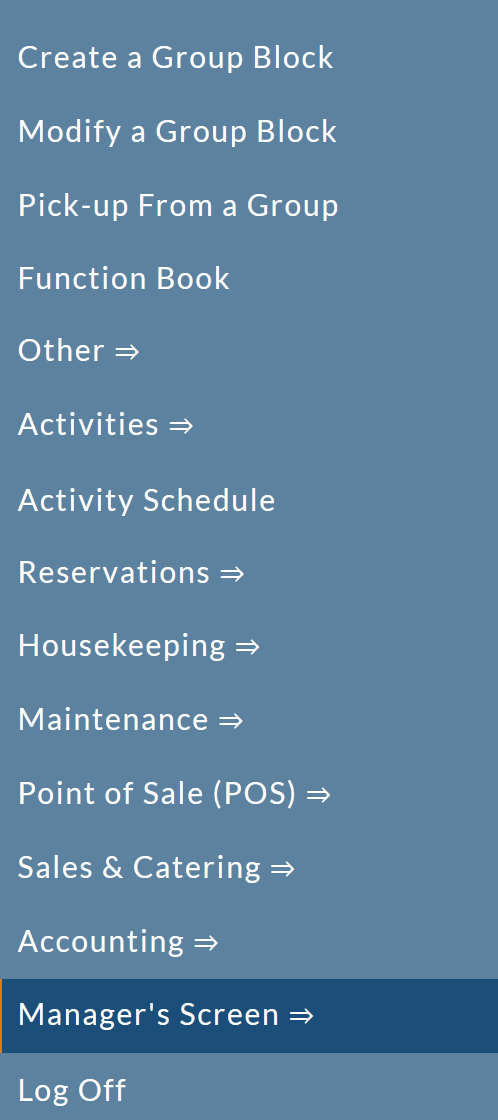
The Manager's Command screen menu has two sections, Manager's Configuration and Manager's Maintenance.
 OR
OR
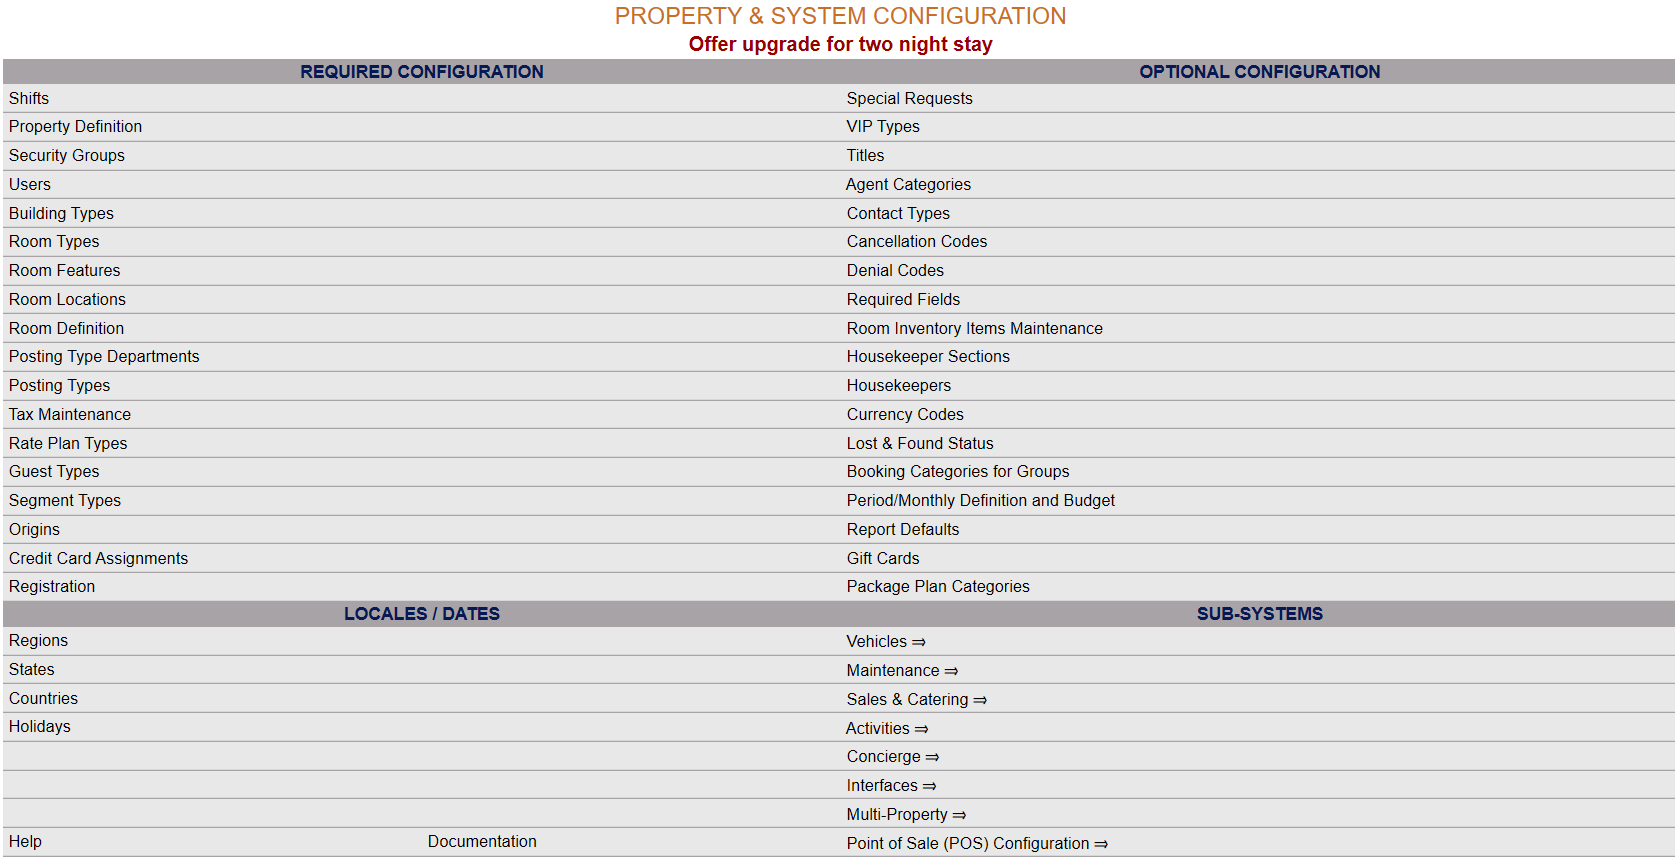
Select Configuration => from the Managers Configuration section to be taken to the Property and System Configuration screen. The list of property configuration options are divided into four sections, which are Required Configuration, Optional Configuration, Locales/Dates and Sub-Systems.
 OR
OR 
(Alternately, you may also be able to select Configuration => directly from the Quick Menu, if the menu has been set up to include the Configuration option).
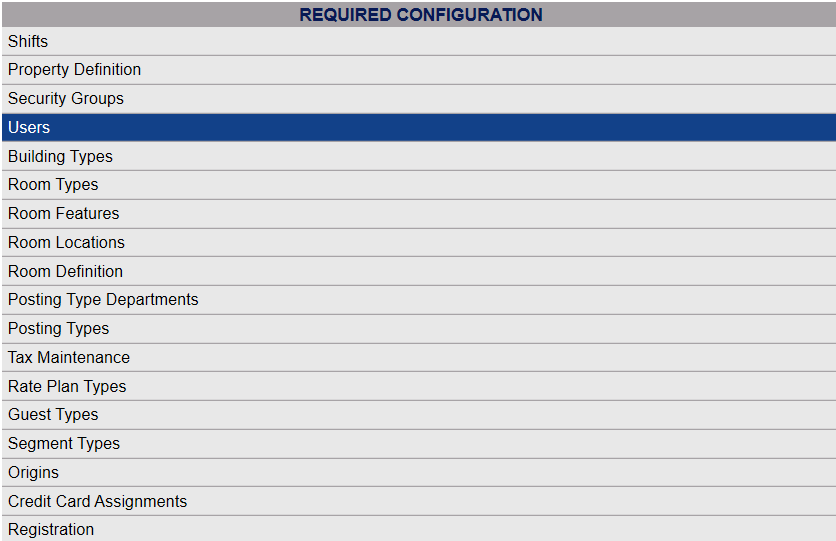
Select Users from the Required Configuration section.
 OR
OR 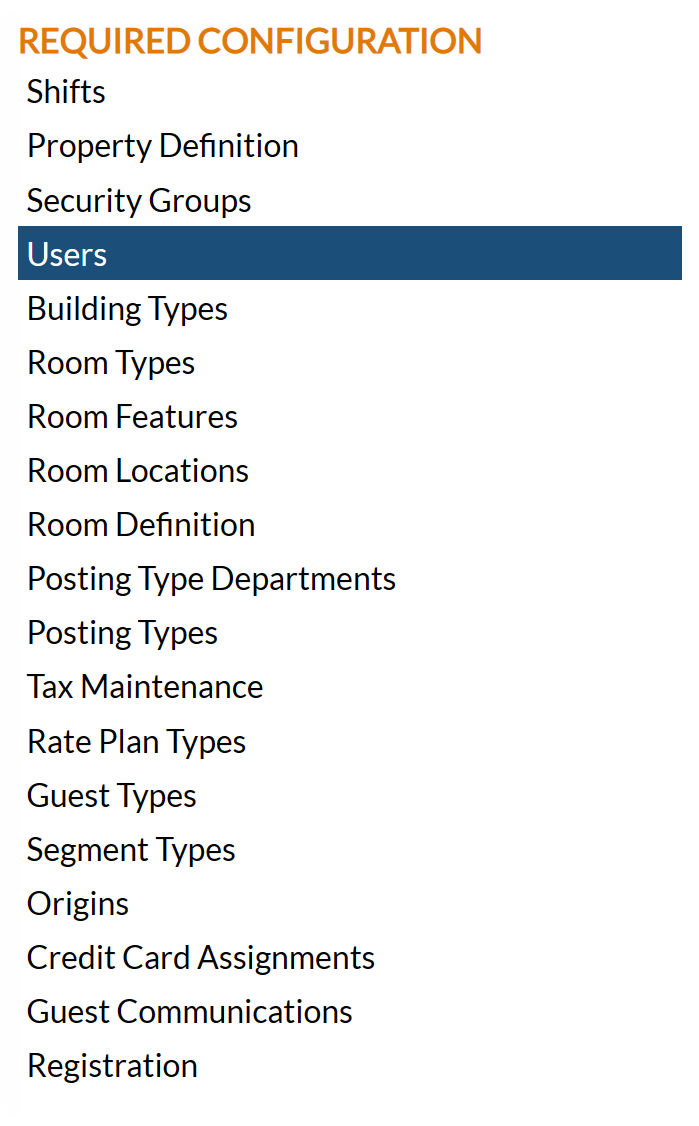
The Users Maintenance screen display is split into two frames, with the left side of the screen listing any already configured Users for the property and the right side containing the fields you need to complete in order to add or edit any User for the property. Any changes made on the right, once saved, will be updated in the listings to the left.

The currently configured options are displayed by:
All: This will be Yes or No. If you are a multi-Property Interface user of Skyware Systems, this refers to if the User in question is considered a User at all possible properties, or not.
Hotel: This is the name of the property. If you are a multi-Property Interface user of Skyware Systems, the default hotel the User is associated with will be listed here.
Note: These first two columns will only be displayed if you are part of a multi-property interface user of Skyware.
User ID: The code used to identify the individual User.
Last Name: The last name of the User. The currently configured options are displayed by this option.
First Name: The first name of the User.
Not Active: This will be Yes or No. This refers to if the user is currently classed as a User within the Skyware system (and therefore has access to use Skyware).
Fin. Auditor: This will be Yes or No. This refers to if this User is entered into the system as a financial night auditor.
HK: This will be Yes or No. This refers to if this User is entered into the system as a housekeeper.
Active HK: This will be Yes or No. This refers to if this User, entered into the system as a housekeeper, is employed/working (active) or not (in-active).
Note: Housekeepers WITHOUT log in privileges to Skyware are not considered Users and thus are not shown in the list of User accounts on this screen.
SM: This will be Yes or No. This refers to f this User is entered into the system as a default Sales Manager.
CM: This will be Yes or No. This refers to if this User is entered into the system as a default Catering Manager.
CSM: This will be Yes or No. This refers to if this User is entered into the system as a default Conference Sales Manager.
Selecting any User on the left will display the details on the right.
Your options include the following:
Generate a new entry:
Click the New  button from the toolbar to add a new User.
Complete the fields described below.
OR:
Select an existing User from the list on the left, and click the Replicate  button from the toolbar. Then change the field information as described below.
Edit the current selection:
Change the field information described below.
The Users Maintenance Screen has two tabs, with the General tab being displayed by default. Several fields on the General tab are required and must be completed to generate the User account.

User ID: This is a unique ID assigned to the individual User. It may be up to 10 characters long, alphanumeric only. Type in the desired ID.
This field is required.
ID: This field is for Internal use by Skyware Systems, will be generated automatically when a new User is saved into Skyware, and cannot be changed.
First Name: This is the User's actual name. Type in the User's first name.
This field is required.
Last Name: This is the User's actual name. Type in the User's last name.
This field is required.
Security Group: This is the security group you wish to have the User assigned to. Different security groups will have different levels of access to Skyware. Select the correct security group from the drop-down menu of available options. If the correct option is not available, please see Security Groups for help in configuring it. The first listed Security group will be shown in the field (usually alphabetically) as this field cannot be left blank.
Note: Some assigned Security Groups also have separate user account screens (such as Attendants or Housekeepers); if a User (with log in access to Skyware) is assigned to such a group the User account profile will appear in BOTH locations.
This field is required.
Default Language: This is the language that Skyware Systems will be displayed in for the User. Select the default language for the user interface from the drop-down menu of available options. By default it will be English.
This field is optional.
Default Menu: This is the Menu screen that will be displayed as the landing page after the User's log-in. Select the option desired from the drop-down menu.
This field is required.
Color Theme: Skyware Systems has multiple menu display options, the "Classic" style (pale blue background), and several "Modern" styles, Modern Curve (white background), Modern Straight (pale blue background), Modern Light (white background) and the most recent, Modern Dark (dark background, useful for using Skyware in bright environments) for displaying Skyware. Choose the preferred one for the User.
Note: As Color Theme is NOT a required field, it may be left blank. If so, the selected Color Theme will be that which was selected for the Property as a whole. See Color Themes for more information.
Quick ID for postings: This is a pin number to identify the User if the posting type requires it. This is NOT the User ID. This may be up to 10 characters long.
This field is optional.
POS Card: If the User has a POS Scan Card the number should be added here.
This field is optional.
Email: This field is for the external (not Skyware) email address of the User used with the Multi Factor Authentication (MFA) process (an external email address is requested for verification purposes). When an email has been entered on the Log In screen, it will automatically be recorded and stored by Skyware in this field for future use.
Verified: This check box may be checked or unchecked. Once the external email address entered in the Email field has been used successfully with a verification code allowing the User to log in to Skyware, the box will be automatically checked.
Mobile Phone: Enter the mobile phone number for the User here, if one is available. This number can subsequently be used to call or text the User.
This field is optional, but a number is required to allow Two Way Texting (between the Property and the User) to occur.
Reset Password: This box may be checked or unchecked. By default for a new User it is checked. The first time a new User attempts to log in they will be prompted to create a password. Once the User has logged in, the box will be unchecked. If need be, the box may be checked once more to allow the User to change their password; the next time they log in they will be prompted for a new one. See Password Setting or Resetting for more details.
Locked Out: This box may be checked or unchecked. By default it is unchecked. if it is checked, the User has been locked out of Skyware due to too many invalid password attempts (7). If this is the case, someone else (a manager) will need to open the User's profile and uncheck the box, then check the reset password box to allow the User to reset the password.
Password Required: Does this User require a password to log into the system? This box may be checked or unchecked. By default it is checked. Checked, this option requires the User to supply a password at log in. For security, Password Required should ALWAYS be checked as allowing any User to access Skyware Systems without a password is a security risk to your Property.
Note: By default BOTH Reset Password and Password required are CHECKED when adding a NEW User. For the Reset Password, it will become unchecked once the staff member has logged into the system and set up a password. Checking it after that initial log in will allow the staff member to create a new password the next time they log in into the system.
Not Active: This box may be checked or unchecked. By default it is unchecked. Click this option to deactivate the account without deleting it. Once an account has been created, it cannot be deleted from the system.
Web User: If this User is used to track when web reservations are made, this box will be checked.
Interface User: If this User is used to run the PC interface, this box will be checked.
Restaurant User: If this User is a default Restaurant User, this box will be checked.
Note: These three User types are used internally by Skyware Systems for interfaces. They are grayed out and cannot be changed by the property.
Financial Night Auditor: If this User is a night auditor and this box is checked, there will be a separate date change for the regular Night Audit and the financial Night Audit, with the system using the "no down time" logic - allowing the date to change for everyone EXCEPT for the night auditor until their work is complete. If this box is checked for any Users, the night auditor needs to make sure they "Z-out for all night auditors" when they are done (AFTER the regular Z-Out) to ensure everyone is working on the correct date.
Sales Manager: If this User is a default Sales Manager, check this box.
Catering Manager: If this User is a default Catering Manager, check this box.
Conference Sales Manager: If this User is a default Conference Sales Manager, check this box.
Quick ID can be used instead of Passcode: This box may be checked or unchecked. By default it is unchecked.
Email Section: Email entered below is used ONLY for sending email FROM Skyware. (Not for use with MFA).
E-Mail Address: Type the User email address. If completed, this will be used in place of the Email address for the property on the Property Definition screen.
This field is optional.
Email Return Receipt: This box may be checked or unchecked. By default it is unchecked.
EMail Username: User name for this Email address in place of the Email address on the Property Definitions screen. Type the User name.
This field is optional.
EMail Password: Type the password for the User's email.
This field is optional.
Note: The required fields must have been completed on the General tab before an account can be saved.

Multiple sections appear on the Multi-Property / Other tab..

Hire Date: Click within the field to open the calendar option to select the correct date of hiring for this User.
This field is optional but recommended.
Housekeeper?: This check box must be checked for the account to be considered a Housekeeper account. If this field is not checked, the user account will not be considered by Skyware as a housekeeper.
Note: The details for any housekeepers entered into Skyware will appear here on the Users screen, but NEW housekeepers should be added using the Housekeepers screen, which will then automatically complete the relevant fields.
Selecting this option will immediately refresh the screen with additional housekeeper specific fields.
Note: IF the account has not yet been saved (and therefore not entered into Skyware) you will be returned to the General tab which shows the required fields for generating an account. Click on the Multi-Property / Other tab to open it once more.

Active Housekeeper: The housekeeper may be listed as Active (and therefore available/working at your Property) or In-Active. Select the appropriate category. In-active housekeepers cannot be assigned rooms on the Housekeeping Room Assignments screen.
Section: This is a drop-down menu of available options. If your Property utilizes Housekeeper Sections, you may select a section for this housekeeper to be associated with from the list.
Maximum Credits when Auto Assigning: (Equivalent to Shift Points) If your Property is using the shift points method to assign rooms to housekeepers via credits, enter the number of credits to be allocated to this housekeeper. (This may be useful if your Property has a wide range of rooms - the actual amount of work depends on the size of the room and the number of beds, thus a large room with multiple beds may be designated as being worth more credits to clean than a small single room. Using the shift points method means that if the housekeepers are designated a certain number of credits to clean per shift, rather than a certain number of rooms, the workload may be distributed more evenly). By default the value entered in this field is 0. This means NO room credits may be assigned to the housekeeper AUTOMATICALLY. To use the auto assign feature, housekeepers must have a number of credits entered greater than 0.
Attendant?: This check box must be checked for the account to be considered an Attendant account. If this field is not checked, the user account will not be considered by Skyware as an attendant.
Note: The details for any attendants entered into Skyware will appear here on the Users screen, but NEW attendants should be added using the Attendants screen, which will then automatically complete the relevant fields.
If not, you may complete them or alter them here:

Selecting this option will immediately refresh the screen with additional attendant specific fields.

Active Attendant: This box may be checked or unchecked. If this attendant is no longer available for any reason, check this box to remove them from your scheduling possibilities.
View Only of Activities: This box may be checked or unchecked. If you wish the attendant to be able to view only (not add, remove or adjust their schedule or appointments) when logged in, check this box. by default it is unchecked.
Note: It IS possible to check this box without checking the User is an attendant. If a User should only be able to view any activities (not add, remove or adjust) then check this box.
Gender: This is a drop-down menu, select one or leave blank.
Maximum Activities Per Day: Enter the maximum number of activities this attendant may be scheduled for in a day. By default it is set at 0.
Allow all Activity Types: This box may be checked or unchecked. If this attendant is capable of performing ALL your possible activity types, you can check this box. Otherwise, you will need to complete the Activity Types section (on the Attendants Maintenance screen), to list any activities that this attendant is qualified to perform.
Note: These options will only be displayed if you are part of a multi-property interface user of Skyware.

Default Hotel: This is a drop-down menu of the available Properties in your Skyware system. Select the hotel which the User should default to. (One property at minimum must allow the User access to Skyware).
This field is required.
User has access to all properties?: This box may be checked or unchecked. By default it is unchecked. Check this box to allow the User to access all properties on your Skyware system.
This user has access to the Default Hotel (above) and ONLY these properties: If the user does NOT have access to all your properties with Skyware, use the Fast Pick button to view and select the properties (other than the property selected as their default property) that the user has access to.
Note: If there are only TWO Properties, the Fast Pick button will be grayed out as giving the User access to the other Property will automatically mean they have access to ALL Properties.
Note: If the User has access to all properties? check box is selected, the screen will immediately refresh and no longer display the Fast Pick option for selecting individual properties.


No Hourly Restrictions: This check box must be checked for the User to be allowed access to Skyware any time of the day or night. By default it is checked. If you do NOT want this User to have unlimited access to Skyware (i.e. to have specific timed log in restrictions), un-check this option.
Un-selecting this option will immediately refresh the screen with additional hourly and day option fields.

Start: Start of hourly restrictions. Select the hour (1-12), minute (in 15 minute increments) and choose AM or PM. The User will have access to Skyware beginning at this time.
End: End of hourly restrictions. Select the hour (1-12), minute (in 15 minute increments) and choose AM or PM. The User's access to Skyware will end at this time.
Choose the days of the week the User will have access to Skyware during the set log in hours.
Note: If you set overnight hours for the User access, it will begin on the earliest day and continue into the next day (for example, if you set access starting at 11 pm and ending at 7 am and check access allowed on Saturday only, the user will have access beginning at 11 pm on Saturday thru to 7 am on Sunday morning. If you set access as Saturday AND Sunday, the access will still begin at 11 pm on Saturday but will now go thru to 7 am on Monday).
Please be aware, un-selecting the No Hourly Restriction option, but not setting any options in the Start, End or Days fields will mean that this User does NOT have access to Skyware at any time. This should only be done if you wish to temporarily suspend the User's access, without inactivating the account (not recommended).
When you are finished adding or editing Users, click the Save  button to save the changes.
To view any changes made, click the Activity log  button in the local tool bar.